Alchemium
Build Native, Modern Windows Applications with HTML5 and JavaScript
© 2014 electric plum
Build Native, Modern Windows Applications with HTML5 and JavaScript
© 2014 electric plum
Use Alchemium to build native Windows applications with HTML5, CSS3, and JavaScript. Extend the platform with a powerful JavaScript to .NET integration bridge.
The Alchemium platform was designed from the ground up to make it easy to build and distribute standalone, native Windows applications using the power of modern HTML5 and JavaScript.
Applications built on Alchemium can target all common versions of Windows from Windows XP through Windows 8.1 (Desktop).
A rich extensibility model lets you leverage Microsoft .NET technologies to extend Alchemium, and the embedded JavaScript environment. Alchemium applications break free from traditonal browser restrictions, and integrate directly with the host operating system.
If you are comfortable with HTML and JavaScript, Alchemium gives you the all the tools needed to create and distribute applications, or breathe new life into existing Windows-based solutions.
Create your first project with the command line tool acp.exe
The Alchemium Create Project utility (acp) is used to lay down the basic directory structure and runtime for an Alchemium-based application. Alchemium operates in two distinct modes, Architect Mode and Release Mode. acp generates a full project directory and executable that runs in Architect Mode. In Architect Mode, when you run your executable it will automatically pick up any changes in the the project directory (.html, .js, .less, .scss, .ts, .coffe etc.) and recompile, and re-display in real-time.
To create a project, do the following:c:\Program Files (x86)\AlchemiumSDK).acp "My App" c:\test\MyAppIf you attempt to create a poject in a directory that is not empty acp will warn you of this, and terminate.
If the target directory does not exist, acp will create it.
After acp.exe has completed its work, your new application will launch in "Architect Mode". You are ready to start live-editing the source for your application. We'll talk more later about the unique features offered when in Architect mode.
Here is a sample sequence:

If you look in the project directory, it will be structured as follows:
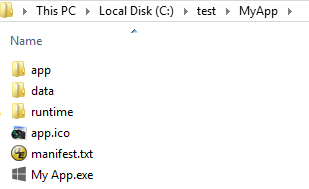
Understanding the project file and directory structure
This is the "Architect Mode" executable for your project. Note, this is not an application ready for distribution. It is a special version of your application that supports an interactive edit/debug/build cycle. Later, when we talk about distributing your application to end-users we will walk through the process of compiling a release build, which removes Architect mode features, compiles, compresses and secures your content/source, and trims the runtime foootprint to the minimum required for an end user installation.
Manifest.txt is a file that contains important metadata and configuration settings for your application. When you created your project with acp, a manifest was generated in the folder specified and set to Alchemium's defaults. View a documented manifest.txt here for more information. When you do a release build, the manifest is embedded into the application bundle.
The app directory (and its subdirectories) contain your application's source code and content. Typically, your app's entry point will
be the file index.html in the .\app\ directory, though this can be overridden in the manifest file.
Internally, Alchemium binds to a special protocol and domain prefix of "http://app". Basically this means that any files in your ./app/* directory and subdirectories can simply be referenced by their paths. You do not need to worry about prefixing resources with "http://app" just make sure you reference based on the path on disk and Alchemnium takes care of the rest. If you watch network traffic in the developer tools, you will see that the resources are ultimately retrived via the http://app prefix. This architecture ensures maximum flexibility, as your resources will be treated as if they are being fetched over http:// as opposed to the more restictive file:// protocol that typically hampers local web site or web application development when you are not using a web server.
For example
Link to file "index.html" in your project's app folder: <a href="index.html">Go to index.html</a>.
An image tag referencing a file in an .\app\img subdirectory on the file system <img src="img/sample.png"/>.
An image tag referencing a file in an .\app\img\foo\bar subdirectory on the file system <img src="img/foo/bar/sample.png"/>.
Alchemium does not require Web server software or network access. The runtime intercepts requests for resources in in the local file system directory where your application is located, and automatically handles them as if they were requests made to "http://app/*", therefore they are handed as true http:// requests, unencumbered by typical limitations of referencing local resources via the file:// protocol prefix. Release builds serve those same resources from a singe compressed, and secured bundle file, so your IP is safe from prying eyes when released.
Alchemium can load any external content directly from the Web with one restriction - pages served from the Web do not support Alchemium's dynamic Less/Sass/CoffeeScript/TypeScript compilation or include tag processing (more on Includes later). Full AJAX/XHR support works against both local resources well as standard http over the Internet. Even better, there are no cross-domain XHR limitations when making an AJAX request from a page in your Alchemium-powered app out to the Web! Alchemium also supports WebSockets in full to handle real-time push/COMET type scenarios.
Alchemium supports the development of extensions built on the .NET Framework 4.0 and higher. Extensions expose.NET code and the full power of the .NET framework to the embedded V8 JavaScript engine as first class JavaScript functions and objects via this extensibility model. To use extensions from your JavaScript code simply copy the assemblies (dll files) into this folder.
Please see the .NET Extension Developer's Guide for more information on creating your own extensions.
Alchemium treats this folder specially. Any .css stylesheets that live here will automatically be added to every page your application loads (just after the DOM is loaded). This includes both pages your application serves up, and pages loaded from the Web.
Another special folder to Alchemium. Any .js files here will automatically be added and executed in every page your application loads (just after the DOM is loaded). This includes both pages your application serves up, and pages loaded from the Web.
As tempting as it is, we recommend you use standard css/js loading techniques for most of your content, as opposed to dumping a bunch of files in css_inject and js_inject. The primary reason css_inject and js_inject exist is to handle the scenario where you do NOT control the content being loaded and want to inject custom stylesheets or JavaScript into a page for adorning existing content, integrating with existing code, or scraping scenarios when the source is beyond your control.
An appropriate example of using injection is how we use it to add a "Back to Alchemium Documentation" UI element when we link to an external page in this documentation. In our example we add some css animation for the fade, and JavaScript to detect that we are not on an Alchemium app page, and create the element. Visit Google.com to see an example.
Here is what the code looks like. We have an inject.css in our .\app\css_inject directory. It contains the following:
div.__epFade {
-webkit-animation: xfade 4s;
opacity: 0; !important
}
@-webkit-keyframes xfade {
from {opacity: 0}
to {opacity: 1}
}
Next, we have an inject.js file in our .\app\js_inject directory. It contains the following:
if (location.href.indexOf("http://app/") === -1) {

var __plumBack = document.createElement('div');
// We want to know when the animation completes
__plumBack.addEventListener("webkitAnimationEnd",
            function() {__plumdimmer22.style.opacity = 1;}, false);

__plumBack.style.position = 'fixed';
__plumBack.style.left = 0;
__plumBack.style.top = 0;
__plumBack.style.width = '100%';
__plumBack.style.height = '30px';
__plumBack.style.opacity = .0;
// Referencing the css class we injected...
__plumBack.className = '__epFade';
__plumBack.style.backgroundColor = 'transparent';
__plumBack.style.backgroundColor = 'black';
__plumBack.style.zIndex = 32766;
document.body.insertBefore(__plumBack, document.body.firstChild);
__plumBack.innerHTML = "<a style='font-family:helvetica;font-size:12pt;
                        text-decoration:none;color:white;position:relative;
                        left:10px;top:3px' href='#'
                        onclick='alchemium.app.goBack();'>
                        <span style='position:relative;top:-1px;font-weight:bold'>
                        ←</span>
                            Return to Alchemium Documentation</a>";
}
Another potential use case for this functionality would be for testing existing sites, verifying content etc.
This directory contains the Alchemium runtime files. These files are required for your Alchemium-based application to run. In Architect mode, it has additional files and compilers for Less, Sass, TypeScript, CoffeeScript etc. When you do a release build it will be stripped down to the bare minimum runtime requirements.
acp.exe also supports creating new projects from an existing project template using the /template=[path_to_project_template] command line switch as the 3rd parameter. For example:
acp.exe "MyD3App" "c:\debug\MyD3" /template="c:\Program Files (x86)\AlchemiumSDK\templates\d3"
In the above example we are creating a new project from the D3 template that ships with the Alchemium SDK. D3 is a popular JavaScript data visualization library. When a template is used, acp will recursively copy all the application source files from the template directory to your newly created project's directory. We encourage the use of templates, as they can save lots of time, especially if you always include a few "go-to" libraries and assets with your applications.
The Alchemium SDK currently ships with two templates: "d3" and "bootstrap". Note they are located in the [ALCHEMIUM_SDK_PATH]\templates subdirectory. You can use a slight bit of shorthand when creating a project based on a template the the [ALCHEMIUM_SDK_PATH]\templates subdirectory, instead of providing the full path the the directory that contains the template, you need only provide the name.
For example, to create a project based on the included "bootstrap" template:
acp.exe "My Bootstrap App" "c:\debug\bootstrap" /template=bootstrap
If you have a standard set of javascript and css libraries you use for your Alchemium projects, it is a good idea to create your own project templates. You can see some examples of templates in the [ALCHEMIUM_SDK_PATH]\templates directory. Templates look exactly like any Alchemium project with only one slight difference. In a project template's manifest.txt file you will enter some special macros to have acp dynamically insert certain fields when creating your new project from the template.
Project template macros in manifest.txt| _ID_ | acp.exe will replace _ID_ with a new globally unique identifier (GUID) that uniquely defines the project. It is critical that each project have a globally unique project id. |
| _NAME_ | acp.exe will replace _NAME_ with the name that was supplied when acp.exe is executed (the first parameter). |
Here is a snippet from the manifest.txt file of a project template, note how the _ID_ macro will be used to direct acp.exe to insert a new unique id in its place, and _NAME_ is used to insert the name chosen when acp.exe is run.:
"id": "_ID_",
"name": "_NAME_",
"startURL": "index.html",
"version": "1.0.0.0",
"cachePath": "{appdata}\\_ID_\\cache",
Let's take a look at the source code for an Alchemium-powered application page. We'll exercise most of the core platform features of Alchemium, and break each one down in detail. The concepts we'll cover are as follows.
<!DOCTYPE html>
<html>
<head>
<script src="alch://jquery.js"></script> 1
<a:include data-file="head.html"/> 2
<link rel="stylesheet" type="text/css" href="css/default.css">
<link href="less/sample.less" rel="stylesheet"> 3
<link href="sass/sample.scss" rel="stylesheet"> 3
<script src="ts/sample.ts"></script> 3
<script src="coffee/sample.coffee"></script> 3
<script>
$(function () {
if (typeof alchemiumSession.getSession('loaded')4  === 'undefined') {

    console.log('Demo1 initializing...');

    if (alchemium.app.installedApplicationUpdate()5) {
        alert('Application was updated!  Welcome to the new version!')
    }
    console.log("Runtime: " + alchemium.app.runtimeVersion);
    alchemiumSession.setSession('loaded', 1);
} else {
    console.log('skipping init...');
}

alchemium.app.unloadAppHandler5 = function () {
// Return true to cancel application shutdown
    return false;
}
$("#testExtension").click(function () {

    var connStr = "Data Source=(local);Integrated Security=true;Database=Northwind;";
    var sqlStr = "SELECT * FROM Customers";

	// Issue a SQL statement to a local SQL Server database and get results
    var results = com.electricplum.sqlserver.getSQLResults({ "connectionString": connStr, "sql": sqlStr });6

    results.data.forEach(function (el) {
        console.log('Company:' + el.CompanyName);
        console.log('Contact:' + el.ContactName);
        console.log('======================================================');
    });

});
$("#testAJAX").click(function () {
var args = {};
args.string = "A string";
args.int = 42;
args.obj = {};
args.obj.p1 = "prop 1";
args.obj.p2 = "prop 2";

$.ajax({6a
	url: "http://myextension.com/ajax",
	type: "POST",
	data: JSON.stringify(args),
	contentType: "application/json",
	dataType: "json",
	success: function (json) {
	alert(json.propertyOne);
	}
});
});

});
</script>
</head>
<body>
<a href="#" id="testExtension">Click me to call C#</a>
<a href="#" id="testAJAX">Click me to call C via AJAX#</a>
</body>
<html>
</html>
<script src="alch://jquery.js"></script>This is an example of using the embedded jQuery 2.0.3. To use an embedded runtime resource we use the alch:// prefix. This is just a convenience feature, you are free to use your own references to libraries in standard fashion either with local copies, or linking to a cdn etc. Alchemium currently embeds the following:
| Library | Reference URI |
| Angular.JS 1.2.11 (And modules) | alch://angular.js
alch://angular-animate.js alch://angular-cookies.js alch://angular-loader.js alch://angular-mocks.js alch://angular-resource.js alch://angular-route.js alch://angular-sanitize.js alch://angular-touch.js |
| Bootstrap v3.1.0 (css) | alch://bootstrap.css |
| Bootstrap v3.1.0 (js) | alch://bootstrap.js |
| jQuery v2.1.0 | alch://jquery.js |
| jQuery v1.11.0 | alch://jquery1.js |
| Leaflet v0.7 | alch://leaflet.js |
| Lo-Dash v2.4.1 | alch://lodash.js |
| Phaser 1.1.5 | alch://phaser.js |
| Pixi.js v1.4 | alch://pixi.js |
| Semantic UI v0.12.4 (css) | alch://semantic.css |
| Semantic UI v0.11.0 (js) | alch://semantic.js |
| Sizzle v1.10.16-pre | alch://sizzle.js |
| Underscore.js v1.5.2 | alch://underscore.js |
| zepto.JS v1.1.2 | alch://zepto.js |
There are no restictions on using local copies of css and JavaScript libraries. The embedded libraries are only included for ease of use. If you want finer control over the versions of libraries employed, simply include them somewhere in your ./app/ directory or any subdirectory and reference them normally. TIP! - We suggest using either embedded or local copies of libraries to ensure your application runs perfectly when the end-user does not have an Internet connection.
<a:include data-file="head.html"/>
Here we are using Alchemium's include file support. When Alchemium encounters an <a:include data-file='somefile.html'/> tag, it will inject the contents of the referenced data-file directly into the response stream. IMPORTANT: This data file must be located in the .\app\includes project directory. Note, this happens before the page is loaded, so it can be thought of as similar to how server-side technologies like PHP and ASP.NET operate.
Includes can nest other includes for maximum composability. Includes make it much easier to maintain large applications with many pages, since you only need to make the changes in one place. They are commonly used for headers, footers, and requently used fragments of HTML in your application.
<link href="less/sample.less" rel="stylesheet"> 3
<link href="sass/sample.scss" rel="stylesheet"> 3
<script src="ts/sample.ts"></script> 3
<script src="coffee/sample.coffee"></script> 3
Alchemium automatically compiles Less, Sass, CoffeScript and TypeScript when resources of their type are requested. Note, the compiler caches the result in Architect mode, and when you do a release build the static results of compilation are embedded in your application's bundle, so you never take a performance hit in the application distributed to your customers.
If you are using CoffeScript, TypeScript there will be a slight delay in Architect mode when the application starts up, as the files are compiled.
Any changes you make to a referenced JavaScript, Less, Sass, CoffeeScript or TypeScript file while your application is running in Architect mode will automatically recompile the source, so you never need to exit the running app to make a change.
At this time, we do not support source maps, so when you are using the integrated debugger, you will be stepping through the resulting JavaScript from the compilation, not the original CoffeeScript/TypeScript.
Alchemium invokes the compiler based on the file extension of the resource. Use the following file extensions:
| Compiler | Extension | Example |
| Less | .less | <link href="less/sample.less" rel="stylesheet"> |
| Sass | .scss | <link href="sass/sample.scss" rel="stylesheet"> |
| CoffeeScript | .coffee | <script src="coffee/sample.coffee"></script> |
| TypeScript | .ts | <script src="ts/sample.ts"></script> |
if (typeof alchemiumSession.getSession('loaded') ...
Alchemium exposes functions to JavaScript that make it very easy to store data globally which can be read and modified
from any page in the application. Simply use:
alchemiumSession.setSession(key, value) to store session data and
var theData = alchemiumSession.getSession(key) to retrieve the data.
You can persist complex objects using JSON.stringify() an JSON.parse() in concert with each other. For example:
var myObj = {};
myObj.prop1 = 42;
myObj.prop2 = 'Alchemium Is Cool!';
// Store it in global session
alchemiumSession.setSession('myKey', JSON.stringify(myObj));
// Retrieve and de-serialize (likely from some other page in your app)
var fromSession = JSON.parse(alchemiumSession.getSession('myKey'));
If you would rather use more standard HTML5 technologies for storing and passing data, you are free to do so. Cookies, localStorage, Web SQL and Indexed DB are all fully supported and available.
Session is designed for runtime creation and access of global data. If you need to persist information, we suggest you use standard HTML5 storage mechanisms such as localStorage, Web SQL, Indexed DB or other 3rd party JavaScript persistence libraries. Note, all storage is private to each application. No HTML5-persisted data is exposed or shared across Alchemium apps. You can of course use Alchemium API's to write directly to the OS file system if you want to share data between applications, but standard HTML5/JavaScript storage APIs write data private to each application.
if (alchemium.app.installedApplicationUpdate() ... {
Here we see an example of using the Alchemium APIs from JavaScript in the page. Alchemium enriches the JavaScript execution environment with a number of APIs to allow for far richer integration and interoperability with the host operating system than ever would be possible from a typical Web page, where code is sandboxed.
Alchemium's JavaScript API surface is broken down into a few namespaces, which are all prefixed with alchemium. :
| Namespace | Notes |
| app | Control various aspects of application behavior. Examples: installedApplicationUpdate(), minimizeApp(), maximizeApp(), setFullScreenMode(), exitApp(), showDevTools(), goBack(), installedApplicaitonUpdate() etc.. |
| io | Interact with the local filesystem. Examples: readAllText(file), writeAllText(file, text), chooseFolder(), chooseFile() |
| os | Interact with the local OS, for launching processes. Examples: shellExecute(fileToOpenWithAssociatedAppinOS), runExternalProcess(process, cmdLine, waitForExit) |
| net | Access to the host OS networking state. Example: isInternetAvailable() |
var results = com.electricplum.sqlserver.getSQLResults({ "connectionString": connStr, "sql": sqlStr });
In this example, we see JavaScript code calling an extension function. The actual extension functionality is implemented in a C# .NET class library that Implements the IAlchemiumExt interface (VB.NET is fully supported as well). This example uses the sqlserver extension that ships with the Alchemium SDK.
The Alchemium runtime scans the .\app\ext\*.dll folder at startup looking for any assemblies that implement IAlchemiumExt. It then presents all the functions that the extension exposes to JavaScript. Note how the caller can pass an arbitratry object to .NET.
When the extension code is executed in C# the JavaScript object passed in will have it's properies packaged into a name/value pair Dictionary<string, object>. The extension can respond with any serializable .NET object and Alchemium will marshal it into the JavaScript execution context and make it available as a standard JavaScript object.
See the .NET Extension Developer's Guide for information on how to create your own extensions.
$.ajax({
url: "http://myextension.com/ajax",
type: "POST",
data: JSON.stringify(args),
contentType: "application/json",
dataType: "json",
success: function (json) {
alert(json.propertyOne);
}
});
Here we see JavaScript that uses jQuery to make an .ajax() call. What may not be immediately obvious is this call will actually be routed to a C# function handler inside of a .NET extension. Extensions can register custom URI schemes which will result in the Alchemium runtime directing the request and POST payload to the extension instead of a network endpoint.
In this example the extension implemented the IAlchemiumExt.getCustomSchemes() function to notify Alchemium that it wants
to handle all requests to http://myExtension.com/*
Let's take a look at what a fragment of that C# code in the extension that registers the scheme handler looks like:
// Register for custom schemes // We'll listen for any requests (href, AJAX etc) to these URI schemes // Requests will be routed to our implementation of IAlchemiumExt.processCustomSchemeRequest ListIAlchemiumExt.getCustomSchemes() { var schemeList = new List (); var myScheme = new AlchemiumScheme(); // http is the preferred prefix to avoid having to deal with the host Alchemium browser // imposing security restrictions on things like post data to non standard URI schemes myScheme.uriPrefix = "http"; myScheme.domain = "myextension.com"; // Default mimeType for our responses myScheme.mimeType = "application/json"; schemeList.Add(myScheme); // At this point, any request to "http://myExtension.com/*" (AJAX, href etc.) will // be routed to our implementation of IAlchemiumExt.processCustomSchemeRequest() return schemeList; }
While this is a little more involved than standard extension function calls, it offers a few advantages. First, it
employs well-worn AJAX idioms to make the call and process the result, meaning it plugs in nicely to existing dynamic Web application
concepts. Another advantage is it can be asynchronous, so if your extention was talking to some old backend client server
legacy database, doing some long query, the UI remains responsive.
Another scenario this can be quite useful for is mocking an endpoint that will ultimately be a true XHR call using the extension to return dummy or test data in the interim.
 As we discussed earlier, Alchemium operates in two distinct modes, Architect Mode and Release Mode. When you are devloping your application, you are running in Architect mode. The basic workflow is as follows:
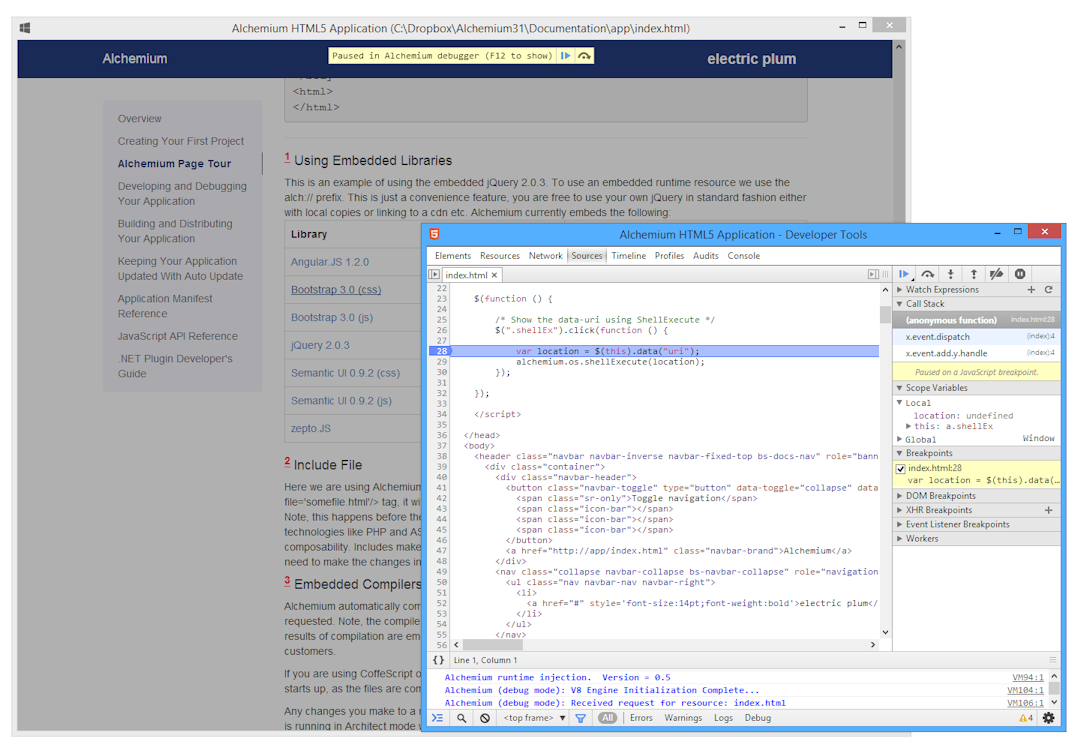
Let's take a look at the developer tools. After you press F12 (or optionally choose 'Developer Tools' from the context menu, or ctrl-shift-c), you will see the developer tools window. In the screen shot below we see the developer tools debugger sitting on a break point. Interestingly, we took this screen shot while we were writing this documentation. This documentation is itself an Alchemium application :)
As you edit source files in your application's .\app directory, Alchemium "listens" for saved changes. When you make an edit and save, Alchemium determines what needs to be recompiled based on dependencies, and it initiates the compilation, and refreshes your application's interface accordingly.
Alchemium attempts to retain all application state, and stay on the current page even after compilation. However, some changes will force a full reprocessing of all source files and reload the initial start page. Note, any edits to the application's manifest.txt file will initiate an automatic full reload.Visual Studio uses shadow copying when editing source files. This unfortunately limits Alchemium's smart compilation. Any edits made to source files using Visual Studio will force Alchemium to do a full recompile and reload of your application start page. The changes will still be picked up, but Alchemium won't be able to retain state and the currently viewed page, it must reload the initial start page.
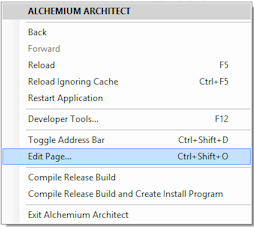
When in Architect mode, Alchemium adds a right-click context menu with useful functionality. Right-click anywhere on your application's user interface to summon this menu. Let's have a look at the options.
Back/Forward/Reload - Standard browser behavior.
Restart Application - Re-Execute the startup/compile/load cycle (the same process that happens when the application is initially executed).
Developer tools - Same as F12, shows the dev tools.
Toggle Address Bar - Shows a bare-bones browser-like address bar. This can be usefull if you want to directly load a page in your application. It can also be useful to navigate to a page on the Internet while researching something as you build your app.
Edit Page - This will summon your editor/IDE of choice (UltraEdit, Sublime, Visual Studio etc.), loading the source of the active page. The editor can be configured in your application's manifest.txt file. See the notes on "editor" in the manifest.txt documentation for details.
Compile Release Build - This will compile the application for release to your customers. Release mode applications do not contain the Architect mode features like dev tools and the developer context menu etc. We will discuss release builds in the next section.
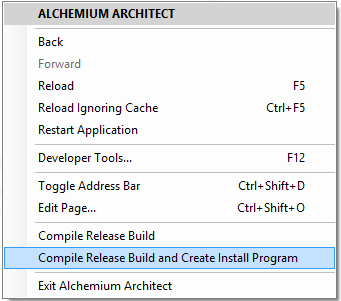
Compile Release Build and Create Install Program - This will compile the application for release to your customers. In addition, Alchemium will automatically create a commercial grade installer that you can use to distribute your application. See the Using the Automated Installation Program Creation Function section for more information on distributing your application.
When you are ready to distribute a release to your customers, you must first package a release build. There are two ways to accomplish this.
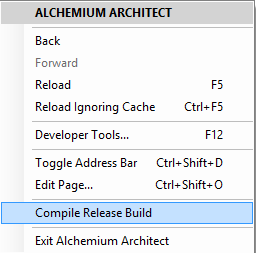 To build from Architect mode, launch your application in Architect mode, and right-click to bring up the context menu. Select Compile Release Build on the context menu. After a minute or
so, Alchemium will notify you that the build is complete, and give you an option to run the release build.
To build from Architect mode, launch your application in Architect mode, and right-click to bring up the context menu. Select Compile Release Build on the context menu. After a minute or
so, Alchemium will notify you that the build is complete, and give you an option to run the release build.
To build from the command line with apack.exe:
apack.exe [Path To Your Project]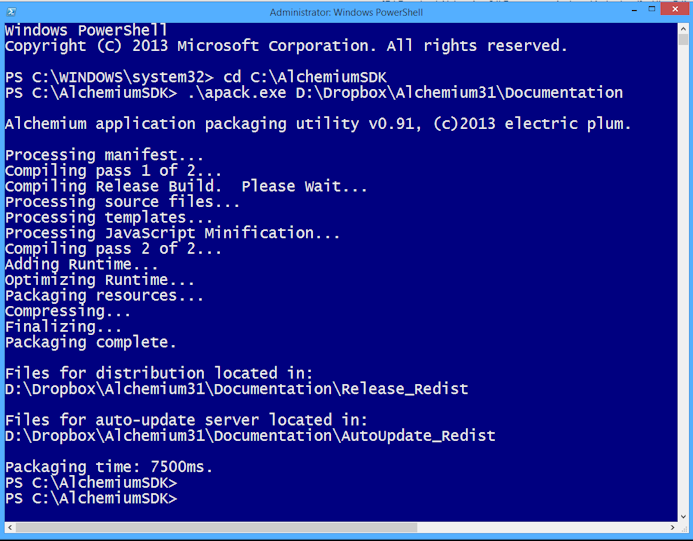
Alchemium bundles a copy of the popular open source installation program Inno Setup. Inno is a commercial grade installation builder for Windows. If you would like to avoid the hassle of creating an installation program for your application, Alchemium can do it for you automatically.
To compile your application and generate an end-user-ready installation program:
Note, the resulting installation program "setup.exe" is created in the .\Installer subdirectory of your project's directory.
The installation program that Alchemium generates is all you need to zip up and distribute so end users can install your application. The installer automatically installs the Alchemium runtime files to a common, shared location if it needs updating on the target machine. This shared runtime used by all Alchemium applications, and reduces the installation foot print, especially if you distribute multiple Alchemium applications.
The installer also handles optionally deploying the .NET Framework v4.0 if the user does not have it installed. In addition, it supports un-installation via add/remove programs in Windows control panel.
If you are experienced with building installation programs, or have some other custom deployment needs, then building a custom installation may be the appropriate choice for distributing your application.
If you prefer to build a custom installer for your application, there are just a few simple steps.
In rare cases, you may prefer to include a specific copy of the runtime for use by just your application (as opposed to the default behavior which uses the shared runtime). This is referred to as the "Captive Runtime". If you are installing a private copy of the runtime, skip, steps 3 and 4 above and follow th instructions below.
The files you need to redistribute to use the Captive Runtime are located at:
[ALCHEMIUM_SDK_PATH]\support\runtime_redist\captive_runtime\*.*
[YOUR_APP_INSTALL_DIR]\runtime (the same directory where your app.zip is located).
If you are building a custom installer please note, Alchemium has one external dependency beyond the runtime. Alchemium applications require that the .NET Framework 4.0 or later be installed on the target machine. Note, this must be the standard .NET redist Alchemium does not support the .NET 4 client profile.. The .NET 4.0 redistributable can be found here. That site contains the file you need to distribute, and good information on detection, silent installation and more.
As mentioned earlier, if you are using Alchemium's built-in installation creation features, this will be handled automatically.
Alchemium applications have the ability to automatically check for updates when they are launched. The following steps are involved
in making your application auto-update-aware:
Each time an Alchemium release mode application is launched, it checks the following:
If those four checks pass, the version of the manifest on the Web Server will be compared to the embedded manifest in the application. If the version on the Web is higher, a download of the app.zip will begin. Once app.zip is downloaded, it's integrity will be verified and the existing app.zip will be archived and replaced.
The application launch phase will complete with all resources being served up from the new app.zip. On typical Internet connections, this entire process will be nearly imperceivable to your customer.
At this time, Alchemium cannot update its embedded runtime via auto-update. Auto-updating of your application code, content, and extensions is the only supported scenario. Therefore, if electric plum releases an updated SDK and runtime, and you apply the new runtime to your application, you must do a release build and release a new version of your installation.
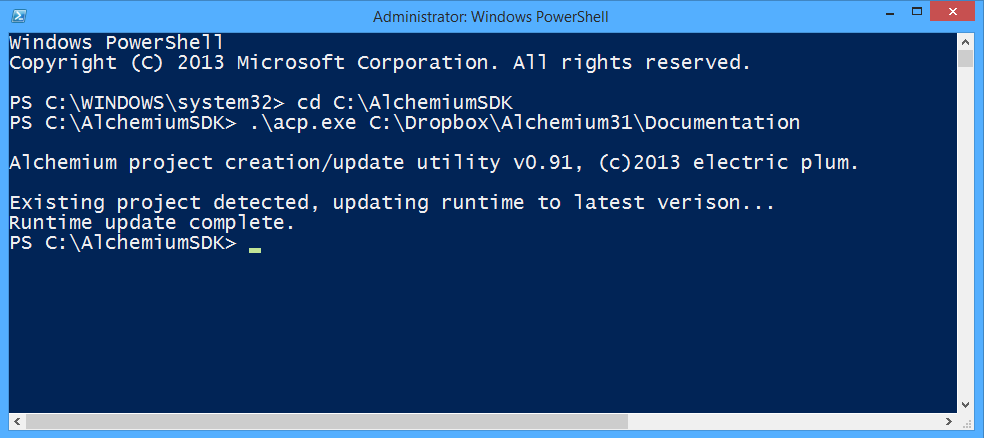
If you would like to update your application with an updated runtime when a new Alchemium SDK is released by electric plum, you must use the acp.exe utility. If you remember, this is the same utility you used to create your Alchemium project.
acp ["PATH_TO_YOUR_PROJECT"]
Here is an example sequence (Our application is in the c:\dropbox\Alchemium31\Documentation directory):
 Probably the most powerful aspect of the Alchemium platform is the support provided to deeply extend its capabilities
via the .NET framework using Alchemium Extensions. Extensions are integrated by the runtime directly into the JavaScript execution environment
using a bridge to the V8 JavaScript engine. This lets front end developers write JavaScript code that executes
.NET code exposed by the extension.
Probably the most powerful aspect of the Alchemium platform is the support provided to deeply extend its capabilities
via the .NET framework using Alchemium Extensions. Extensions are integrated by the runtime directly into the JavaScript execution environment
using a bridge to the V8 JavaScript engine. This lets front end developers write JavaScript code that executes
.NET code exposed by the extension.
Anything is possible with an extension, some examples follow:
Writing an extension entails the following:
When an Alchemium application is launched, the runtime will first check to see if any files need to be auto-updated (as discussed in the Updating Alchemium Applications section.) After any extensions or content files are updated, Alchemium scans the .\app\ext\*.dll folder looking for any assemblies that implement IAlchemiumExt. Each assembly that implements IAlchemiumExt is then instantiated and Alchemium begins the process of interrogating the assembly, ultimately presenting its functions to JavaScript as if they were standard JavaScript functions.
When the extension code is executed from JavaScript, Alchemium packages the JavaScript arguments into a name/value pair Dictionary<string, object> and hands that Dictionary to the IAlchemiumExt::invoke implementation, passing the name of the function that was called as well. The extension can respond with any serializable .NET object, and Alchemium will marshal it into the JavaScript execution context and make it available as a standard JavaScript object.
This type of extension function call is synchronous, but we will also cover how extensions can be accessed asynchronously using XHR/AJAX.
var ret = com.electricplum.ext.test1({ p1: 10, p2: 42 });
In this example, we see JavaScript code calling an extension function. The actual extension functionality is implemented in a C# .NET class library that Implements the IAlchemiumExt interface (VB.NET is fully supported as well).
The Alchemium runtime scans the .\app\ext\*.dll folder at startup looking for any assemblies that implement IAlchemiumExt. It then presents all the functions that the extension exposes to JavaScript. Note how the caller can pass an arbitratry object to .NET.
When the extension code is executed in C# the JavaScript object passed in will have it's properies packaged int a name/value pair Dictionary<string, object>. The extension can respond with any serializable .NET object and Alchemium will marshal it into the JavaScript execution context and make it available as a standard JavaScript object.
$.ajax({
url: "http://myextension.com/ajax",
type: "POST",
data: JSON.stringify(args),
contentType: "application/json",
dataType: "json",
success: function (json) {
alert(json.propertyOne);
}
});
In the snippet of code above, we see some JavaScript code that uses jQuery to make an .ajax() call that ultimately calls our extension. Extensions can register to listen for custom URI schemes via their implementation of IAlchemiumExt.getCustomSchemes(). When an extension registers custom schemes, the Alchemium runtime will direct resource requests and POST payloads to the extension's implementation of IAlchemiumExt.processCustomSchemeRequest() instead of a network endpoint.
In this example, the extension implemented the IAlchemiumExt.getCustomSchemes() function to notify Alchemium that it wants
to handle all requests to http://myExtension.com/*
Let's take a look at what a fragment of that C# code in the extension that registers the scheme handler looks like:
// Register for custom schemes
// We'll listen for any requests (href, AJAX etc) to these URI schemes
// Requests will be routed to our implementation of IAlchemiumExt.processCustomSchemeRequest
List<AlchemiumScheme> IAlchemiumExt.getCustomSchemes()
{
var schemeList = new List<AlchemiumScheme>();
var myScheme = new AlchemiumScheme();
// http is the preferred prefix to avoid having to deal with the host Alchemium browser
// imposing security restrictions on things like post data to non standard URI schemes
myScheme.uriPrefix = "http";
myScheme.domain = "myextension.com";
// Default mimeType for our responses
myScheme.mimeType = "application/json";
schemeList.Add(myScheme);
// At this point, any request to "http://myExtension.com/*" (AJAX, href etc.) will
// be routed to our implementation of IAlchemiumExt.processCustomSchemeRequest()
return schemeList;
}
Let's take a look at a fully implemented extension, and dive in to the core concepts. This extension contains all the code snippets we have looked at so far in this section. This is the source code for a fully functional extension implemented in C#. It is also included in your Alchemium SDK samples directory.
The easiest way to debug your extension while your Alchemium application is running is as follows:
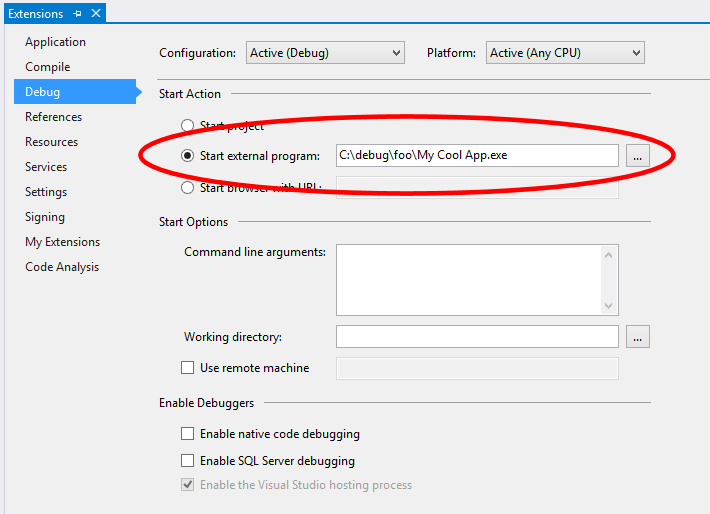
Once you have followed these steps, you can do a simple run/debug directly from within Visual Studio, set break points etc.
Make sure your extension targets x86 and .NET 4.0
The Alchemium SDK ships with some useful extensions. The extensions are all located in the .\ext subdirectory of your SDK installation. To use a given extension you simply copy the DLL (and possible dependencies where noted) to the ".\app\ext" subdirectory of any Alchemium project. The extension will automatically be packaged and installed with your application when you build an executable and user the integrated distrubution and setup tools.
The com.electricplum.sqlserver extension allows JavaScript to issue queries directly to a SQL Server. It also allows for the execution of SQL statements. The extension has three functions:
// A simple query against the SQL Server Northwind sample database
// All APIs expect a connection string in the passed in .connectionString property.
var connStr = "Data Source=(local);Integrated Security=true;Database=Northwind;";

// getSQLResults() returns an array of objects for each row in the result set in the "data" property
// Each row is an object with the property names based on the SQL result column names
var sqlStr = "SELECT * FROM Customers";
var results = com.electricplum.sqlserver.getSQLResults({ "connectionString": connStr, "sql": sqlStr })

// Walk through the result set and output some column values
results.data.forEach(function (el) {
    console.log('Company:' + el.CompanyName);
    console.log('Contact:' + el.ContactName);
});

// executeScalar() executes the query, and returns the first
// column of the first row in the result set returned by the query.
// Additional columns or rows are ignored.
// The return value is in the .result property
sqlStr = "SELECT COUNT(*) FROM Customers";
var scalarTest = com.electricplum.sqlserver.executeScalar({ "connectionString": connStr, "sql": sqlStr})
console.log('There are ' + scalarTest.result + ' Customers in Northwind.');

// executeNonQuery() executes a Transact-SQL statement against the
// connection and returns the number of rows affected in the .result property
sqlStr = "UPDATE Customers SET Fax = 'None' WHERE Fax IS NULL";
var execNonQueryTest = com.electricplum.sqlserver.executeNonQuery({ "connectionString": connStr, "sql": sqlStr })
console.log(execNonQueryTest.result + ' row(s) affected.');
The com.electricplum.sqlite extension allows JavaScript to issue queries directly to a a local SQLite database on the filesystem. Note, Alchemium's HTML5 storage APIs also support SQLite from the official JavaScript/HTML5 layer, however that is limited to the browser's storage sub system. If you need to directly manipulate and access SQLite databases outside of the browser sandbox, this extension can be handy. The extension has seven functions:
The SQLite extension has an additional dependency: System.Data.SQLite.dll.
Be sure to include both SQLLiteExtension.dll and System.Data.SQLite.dll in your app\ext directory. Both files can be found in the .\ext subdirectory of your Alchemium SDK installation folder.
var sqlStr = "";
var retVal;

// Create a new database in c:\debug (Note use of \\ for proper escaping since
// our interface to the extension is via JSON...

// Create a new one every time
if (alchemium.io.fileExists("c:\\debug\\newdb.db")) {
    alchemium.io.deleteFile("c:\\debug\\newdb.db");
}

retVal = com.electricplum.sqlite.create({ "file": "c:\\debug\\newdb.db" });

// The .ok property will be true if all went well
if (retVal.ok) {
    // Now connect.. For efficiency and concurrency issues,
    // the sqlite extension is designed to connect
    // and then all subsequent calls will simply operate on the current connection.
    // This is different from the SQL Server extension,
    // where we connect/disconnect on every method call
    retVal = com.electricplum.sqlite.connect({ "file": "c:\\debug\\newdb.db" });

    if (retVal.ok) {

        sqlStr = "CREATE TABLE IF NOT EXISTS Foo (F1, F2, F3)";
        retVal = com.electricplum.sqlite.executeNonQuery({ "sql": sqlStr });

        if (retVal.ok) {

            // Insert 100 rows into our new table
            for (var i = 1; i <= 100; i++) {
                sqlStr = "INSERT INTO Foo (F1, F2, F3) ';
                sqlStr = sqlStr + "VALUES (" + i + ",'Some text " + i + "', 'F3 Stuff')";
                retVal = com.electricplum.sqlite.executeNonQuery({ "sql": sqlStr });
                if (retVal.ok) {
                    console.log('Inserted ROW ' + i);
                }
            }

            // Now read some back
            sqlStr = "SELECT * FROM Foo WHERE F1 BETWEEN 42 AND 64";
            var results = com.electricplum.sqlite.getSQLResults({ "sql": sqlStr });

            if (results.ok) {
                results.data.forEach(function (el) {
                    console.log('F1:' + el.F1 + ' F2: ' + el.F2);
                });
            }
        }
    }
} else {
    // If there was an error, we can check the .lastError property for details
    console.log('Error creating Database Database: ' + retVal.lastError);
}

// Important, we need to explicity close SQLite databases
com.electricplum.sqlite.close();
The com.electricplum.excel extension exposes a simple API for creating and manipulating Excel Spreadsheets. The extension has 10 APIs:
var excelInstalled = com.electricplum.excel.isExcelInstalled({});

if (excelInstalled.installed) {

    // Show Excel
    com.electricplum.excel.show({});

    // Add a new sheet named foo
    com.electricplum.excel.addSheet({ "sheetName": "foo" });

    // Set a formula in a cell
    com.electricplum.excel.setCellFormula({ "sheetName": "foo", "row": 1, "col": 1, "value": "=10+10" });

    var args = {};

    // Set the value of 32 cells using row/col index
    for (var i = 0; i < 32; i++) {

    	args.sheetName = "foo"
    	args.row = i + 1;
    	args.col = 2;
    	args.value = "Hello Excel from row " + (i + 1);

        com.electricplum.excel.setCellValue(args);
    }

    // Load an existing Workbook (Note the \\ in the filepath)
    com.electricplum.excel.load({"fileName": "c:\\debug\\test.xlsx"});


} else {

    console.log("Excel is not installed.");
}
The com.electricplum.cominterop extension allows JavaScript to call functions, properties and methods of COM objects to facillitate integration with legacy systems and APIs. The extension has two functions:
The code sample below illustrates using the COM Interop Extension from JavaScript. The example covers making a method call, a function call, property let, and property get.
// Create our object, we will pass the someCOMObject JavaScript object
// in future calls to "callCOMObject()" to invoke properties and
// methods of the COM object returned by createObject()
// progId is the same as the COM object's progID used when doing late-bound object creation
// from .NET or classic COM

var someCOMObject = com.electricplum.cominterop.createObject({ "progId": "COMTest.Test" });

// Standard COM method calls use callType: "method"
// The next line is equivalent the code: someCOMObject.foo(42, "FortyTwo");
// NOTE: the extension only supports up to 16 parameters per function call in the args[] array.

com.electricplum.cominterop.callCOMObject({ "object": someCOMObject,
                                            "procName": "foo",
                                            "callType": "method",
                                            "args": [42, "FortyTwo"] });

// Access functions that have a return value with callType: "get"
// The next line is equivalent the code: var sum = someCOMObject.sum(1, 5, 12, 20);

var sum = com.electricplum.cominterop.callCOMObject({ "object": someCOMObject,
                                                      "procName": "sum",
                                                      "callType": "get",
                                                      "args": [1, 5, 12, 20] });
console.log("sum = " + sum.value); // <= 38

// Property Lets use callType: "let"
com.electricplum.cominterop.callCOMObject({ "object": someCOMObject,
                                            "procName": "someProperty",
                                            "callType": "let",
                                            "args": ['Hello from JavaScript'] });

// Property Lets use callType: "get"
var propVal = com.electricplum.cominterop.callCOMObject({ "object": someCOMObject,
                                                          "procName": "someProperty",
                                                          "callType": "get",
                                                          "args": [] });

console.log("propVal = " + propVal.value); // <= 'Hello from JavaScript'
The com.electricplum.xboxController extension allows JavaScript to access any connected XBox 360 Game controllers. While there are official integrated Game Controller APIs in the works for Chromium, they are still not ready for production. Thus, Alchemium includes this extension for HTML5 game developers. The extension uses DirectX/XInput to present the game controller to JavaScript. Typical usage involves polling the controller in your game loop (typically using a game loop that employs requestAnimationFrame() for optimal performance and fidelity).
The code sample below illustrates using the GameController Extension from JavaScript.
Note, this extension will only support XBox 360 controllers (wireless or wired). We suggest you test the state.connected return value to determine if a 360 controller is installed, and fallback gracefully to an alternate input scheme.
// ...
// ... some game loop where you would poll getControllerState() repeatedly ...
// ...
var results = com.electricplum.xboxController.getControllerState({ "controller": "1" });

if (!results.state.connected) {
	alert("No powered on 360 Controllers detected!);
	// ** Abort, fallback etc.. ** /
}

console.log("Controller 1 - connected: " + results.state.connected");
// the following properties are returned in results.state:
console.log(results.state.ADown);
console.log(results.state.BDown);
console.log(results.state.XDown);
console.log(results.state.YDown);
console.log(results.state.BackDown);
console.log(results.state.StartDown);
console.log(results.state.LShoulderDown);
console.log(results.state.RShoulderDown);
console.log(results.state.LStickButtonDown);
console.log(results.state.RStickButtonDown);
console.log(results.state.DPadUp);
console.log(results.state.DPadDown);
console.log(results.state.DPadRight);
console.log(results.state.DPadLeft);
console.log(results.state.LTrigger);
console.log(results.state.RTrigger);
console.log(results.state.LThumbX);
console.log(results.state.LThumbY);
console.log(results.state.RThumbX);
console.log(results.state.RThumbY);
Alchemium provides a small set of JavaScript API's that facillitate interacting with the Alchemium runtime and the host operating system. We have kept the API surface small and simple on purpose. Our goal is for the community to build even richer API's using the Alchemim Extension Model. If you don't see something you need out of the box, it is trivial to add APIs if you have experience building class libraries with C# or VB.NET. In this section we'll break down each of the alchemium.* APIs by namespace.
| alchemium.app.setTitle(title) | |
| Set the title of the native application window. (Initially set by Alchemium based on the manifest.txt file. | |
| Arguments | |
| title | (string) |
| alchemium.app.setDimensions(width, height) | |
| Set the native application window dimensions. (Initially set by Alchemium based on the manifest.txt file. | |
| Arguments | |
| width | (int) in pixels |
| height | (int) in pixels |
| alchemium.app.setResizeMode(mode) | |
| Set the window's border style. (Initially set by Alchemium based on the manifest.txt file. | |
| Arguments | |
| mode | (int) 1 = Sizable, 2 = FixedSinge, 3 = Fixed Dialog |
| alchemiumSession.setSession(key, value) | |
| Add data to the globally managed session store. More info on session can be found here | |
| Arguments | |
| key | (string) Unique key identifying this value |
| lalue | Value to store in session |
| alchemiumSession.getSession(key) | |
| Function() Returns string data from the globally managed session store based on the key. | |
| Arguments | |
| key | (string) Unique key identifying this value |
| alchemium.app.setMaximizeButtonMode(show) | |
| Should the maximize button be shown in the window's non-client area. (Initially set by Alchemium based on the manifest.txt file. | |
| Arguments | |
| show | (bool) |
| alchemium.app.setMinimizeButtonMode(show) | |
| Should the minimize button be shown in the window's non-client area. (Initially set by Alchemium based on the manifest.txt file. | |
| Arguments | |
| show | (bool) |
| alchemium.app.setBackButtonMode(enabled) | |
| If true, the backspace key navigate to the previously viewed application page like a standard browser. (Initially set by Alchemium based on the manifest.txt file. | |
| Arguments | |
| enabled | (bool) |
| alchemium.app.setF5RefreshMode(enabled) | |
| If true, the F5 key will reload the current application page like a standard browser. (Initially set by Alchemium based on the manifest.txt file. | |
| Arguments | |
| enabled | (bool) |
| alchemium.app.showAddressBar(show) | |
| If true, Alchemium will display an address bar and bak/forward buttons at the top of the application's UI. | |
| Arguments | |
| show | (bool) |
| alchemium.app.minimizeApp() | |
| Minimize the application window. |
| alchemium.app.maximizeApp() | |
| Maximize the application window. |
| alchemium.app.setFullScreenMode(enabled) | |
| If true, puts the application in full screen mode (useful for Kiosk-based apps as well as immersive games). (Initially set by Alchemium based on the manifest.txt file. | |
| Arguments | |
| enabled | (bool) |
| alchemium.app.showDevTools() | |
| Show the developer tools. Only functional in Architect mode. |
| alchemium.app.exitApp() | |
| Close the application window and quit. |
| alchemium.app.goBack() | |
| Navigate backward. Note, this should be used instead of the window.history implementation. |
| alchemium.app.goForward() | |
| Navigate forward. Note, this should be used instead of the window.history implementation. |
| alchemium.app.installedApplicationUpdate() | |
| Function() returns true if the application was automatically updated when launched. More information on auto updating can be found here. |
| alchemium.app.isInternetAvailable() | |
| Function() returns true the Internet can currently be accessed. |
| alchemium.app.getSourceFileName() | |
| Function() returns the string representing the source file on disk for the active application page (Only available in Architect Mode). |
| alchemium.app.isReleaseBuild() | |
| Function() returns true if the application is running in Release mode, and false if running in Architect mode. |
| alchemium.app.getManifestJSON() | |
| Function() returns an Object representation of the manifest.txt file for the current application. Note the manifest also supports you adding "custom" key/values. More information on the manifest.txt file can be found here.. |
For performance and synchrony reasons, Alchemium will look for implementations of certain callback functions, and if you have provided an implementation for them, they will be invoked when various application events occur.
| alchemium.app.windowMaximized() | |
Callback - If your code implements this function it will be called when the OS application window is maximized. To create the callback add the following code to your page (or include to use across multiple pages):
alchemium.app.windowMaximized = function () {
// Do something here
}
|
| alchemium.app.windowMinimized() | |
| Callback - If your code implements this function it will be called when the OS application window is minimized. |
| alchemium.app.windowRestored() | |
| Callback - If your code implements this function it will be called when the OS application window is restored to normal state from a minimized or maximized state. |
| alchemium.app.beforeNavigate()(currentPage, newPage) | |
| Callback - If your code implements this function it will be called when your application is changing pages | |
| Arguments | |
| currentPage | The URI of the current page. |
| newPage | The URI of the page the application is navigating to. |
| alchemium.os.messageBox(msg, title, buttons, icon) | |
Function() Shows an OS native MessageBox to the user with optional buttons and icons, returns the user's response. For example:
var mbRet;
var msg = "What say you?";
var title = "My App";
var buttons = alchemium.const.mbButtons_AbortRetryIgnore;
var icon = alchemium.const.mbIcon_Question;

// Show the "Abort/Retry/Ignore messageBox
mbRet = alchemium.os.messageBox(msg, title, buttons, icon);

if (mbRet === alchemium.const.mbResult_Ignore) {
    alert("Don't Ignore Me!");

} else {
    alert("you answered " + mbRet);
}
|
|
| Arguments | |
| msg | (string) Descriptive text for message. |
| title | (string) Title for message |
| buttons | (int) The type of buttons to show. For convenience, constants have been defined in the alchemium.const.* namespace:
|
| icon | (int) The type of icon to show. For convenience, constants have been defined in the alchemium.const.* namespace:
|
| Returns | |
| Return Value | (int) The input option chosen by the user. For convenience, constants have been defined in the alchemium.const.* namespace:
|
| alchemium.os.shellExecute(fileName) | |
| Open fileName with the OS application associated with the file's extension. | |
| Arguments | |
| fileName | (string) |
| alchemium.os.runExternalProcess(exeName, arguments, runHidden, waitForExit) | |
| Launch the process exeName. | |
| Arguments | |
| exeName | (string) Process to execute |
| arguments | (string) Command line arguments to pass to process. |
| runHidden | (bool) If true, hides the launched process' application window. |
| waitForExit | (bool) If true, runs the process synchronously. Control will not return to the JavaScript calling code until the process is closed. (WARNING use with care!) |
| alchemium.os.getRegistryValue(keyName, valueName) | |
Function() returns value of requested registry key. For example:var regVal = alchemium.os.getRegistryValue("HKEY_CURRENT_USER\\Software\\MyApp", "MyValue")
alert("Registry value: " + regVal);
|
|
| Arguments | |
| keyName | (string) Name of the registry key to read. |
| valueName | (string) The name of the value to read from the "keyName" registry key. |
| alchemium.os.setRegistryValue(keyName, valueName, valueToSet) | |
Set value of a registry key. For example:alchemium.os.setRegistryValue("HKEY_CURRENT_USER\\Software\\MyApp", "MyValue", "Some value")
|
|
| Arguments | |
| keyName | (string) Name of the registry key to read. |
| valueName | (string) The name of the value we'll be writing to. |
| valueToSet | (string) The value we will set "valueName" to. |
| alchemium.os.subscribeToProcessChannel(channel) | |
Used for inter-process communication between your Alchemium applications. In order to begin receiving messages
on this channel you must implement a handler like so:
//Listen on channel 'foo'
alchemium.os.subscribeToProcessChannel("foo");

// When another app broadcasts a message to channel 'foo', our handler will be invoked
alchemium.os.processMessageReceived = function (channel, msg) {
    alert('Received msg on channel = ' + channel + ', msg = '  + msg);
}
|
|
| Arguments | |
| channel | (string) The channel to listen on. When other processes broadcast a message to this channel your application's implementation of alchemium.os.processMessageReceived() will be invoked if it exists. |
| alchemium.os.unSubscribeFromProcessChannel(channel) | |
| Used for inter-process communication between your Alchemium applications. After an unsubscribe, your process will no longer receive messaages broadcasted to channel. | |
| Arguments | |
| channel | (string) The channel to unsubscribe from. |
| alchemium.os.broadcastProcessMessage(channel, message) | |
|
Used for inter-process communication between your Alchemium applications. This method will send the string message to any other Alchemium applications that have subscribed to channel via the alchemium.os.subscribeToProcessChannel() method. Note, you will not receive messages from your own broadcastProcessMessage() call, even if you are listening on the channel. Tip: Use JSON.stringify() and JSON.parse() together to broadcast objects from process to process. |
|
| Arguments | |
| channel | (string) The channel to broadcast to broadcast to. |
| message | (string) The string message to send. |
| alchemium.io.fileExists(fileName) | |
| Function() Returns true if fileName exists, false if not. | |
| Arguments | |
| fileName | (string) Full path to file to check. |
| alchemium.io.directoryExists(directoryName) | |
| Function() Returns true if directoryName exists, false if not. | |
| Arguments | |
| directoryName | (string) Full path to directory to check. |
| alchemium.io.deleteFile(fileName) | |
| Deletes file fileName permanently. | |
| Arguments | |
| fileName | (string) Full path to file to delete. |
| alchemium.io.readAllText(fileName) | |
| Function() Returns string contents of file fileName. | |
| Arguments | |
| fileName | (string) Full path to file to read. |
| alchemium.io.writeAllText(fileName, text) | |
| Writes the string text to file fileName. | |
| Arguments | |
| fileName | (string) Full path to file to read. |
| text | (string) String of text to write. |
| alchemium.io.chooseFile(title, initialDir, filters) | |
Function() Shows the OS "Open File Dialog" and returns string with the full path of the file name selected. The dialog's file types dropdown will be populated by parsing the filter passed in.. For example:
var title = "Select a file";
var filter = "All Files (*.*)|*.*|Text files (*.txt)|*.txt";
var initDir = "c:\";
var file = alchemium.io.chooseFile(title, initDir, filter);
alert("You chose: " + file);
|
|
| Arguments | |
| title | (string) Descriptive text for dialog. |
| initialDir | (string) Directory to start in. |
| filters | (strings) Pipe delimited list of filter definitions (see the example above). |
| alchemium.io.chooseFolder(description) | |
| Function() Shows OS "Select Folder" dialog and returns the string name of the folder the user selected. | |
| Arguments | |
| description | (string) Descriptive text to show in the dialog. |
* Note, Technically, Architect mode "works" on Windows XP. However, we do not actively test Architect mode or SDK tools on Windows XP.
 Ruby
Ruby
We are standing on the shoulders of giants and would like to thank all the developers that have contributed to these projects.
Last but not least, we'd like to thank you for using Alchemium. Like many platforms, Alchemium was originally created to scratch an itch, and it grew to so much more. We hope you enjoy the product and build great applications. We're excited to see the results.